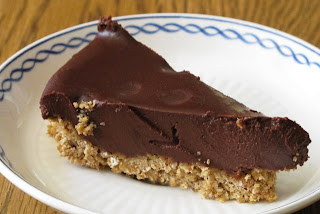
The other day I was craving chocolate like mad, but not just any chocolate! The creamiest chocolatey dessert ever! This pie was the perfect solution to my desideri cioccolati. It is also the perfect pie to make when you want the rich smooth texture of a cream pie without the added cow milk fat and butter.
Yields about 12 servings
Crust:
- 3/4 cup raw almonds
- 1/4 cup coconut oil
- 3 tablespoons maple syrup (or can use agave syrup as well)
- 1/4 teaspoon fine grain sea salt
- 1/2 cup oat flour (can grind oats with food processor)
- 1 cup regular oats
Filling:
- 1 bag semi-sweet chocolate chips (or dark chocolate)
- 1 (15-ounce) can full-fat coconut milk, chilled in the fridge 4 hours or overnight
- Pinch of salt
- 2 teaspoons pure vanilla extract

 2) Squish all of the dough into a pie pan. Unfortunately I was lacking a pie pan while making this so it didn't turn out as pretty as possible. Although if you do use a pie pan, I'm sure your pie will turn out just lovely. Either way it will still be very yummy (which is the most important part in my opinion). Make sure the dough is decently flattened out in the pan evenly. The harder you press it, the better it will stay together. Poke a few holes in the dough with a fork so no bubbling will occur.
 3) Stick in oven. Bake for about 10-13 minutes until golden brown. Pull out and let cool for 20 minutes.
4) Pull coconut cream from fridge. It should be either solidified or a very thick cream. Open can with caution and pour out excess water. Scoop rest into stove pan. Heat on medium low heat. While heating, pour in entire bag of chocolate chips. Stir until melted completely. Remove from heat and add salt and vanilla. Stir all ingredients together.
While all this adding and mixing was happening both of my dogs could not take their little eyes off of the process.
5) When it it completely mixed together, pour onto the cooled crust. Carry pie gently over to the freezer. Let set in freezer for at least 2 hours (this part is the worst, I'm so impatient).
6) Finally after all that waiting you can pull out your beautifully decadent looking pie! If your pie is still super jiggly or slightly liquidy when it comes out, it would probably be best to let it freeze for a little longer. After this you should let it sit for about 15 minutes at room temp. Then! Finally! You are allowed to cut into it. Sometimes washing hot water over the knife first helps the cut come easier. Enjoy!!!!
*If you want a little something extra you can add a fruity topping (blueberries, strawberries, etc.)
Fruity Topping:
- 1 cup fruit (I used blueberries..... obviously)
- 2 tablespoons pure maple syrup (or agave)
- 1 teaspoon vanilla extract
- 1 teaspoon cornstarch
Heat fruit on medium low. Whisk together cornstarch and sweetener (no little clumps). Mix with fruit. Then add vanilla. Mix together until syrup-like. Lastly drizzle over your wonderful slice of heaven. It's sooooo GOOD!


